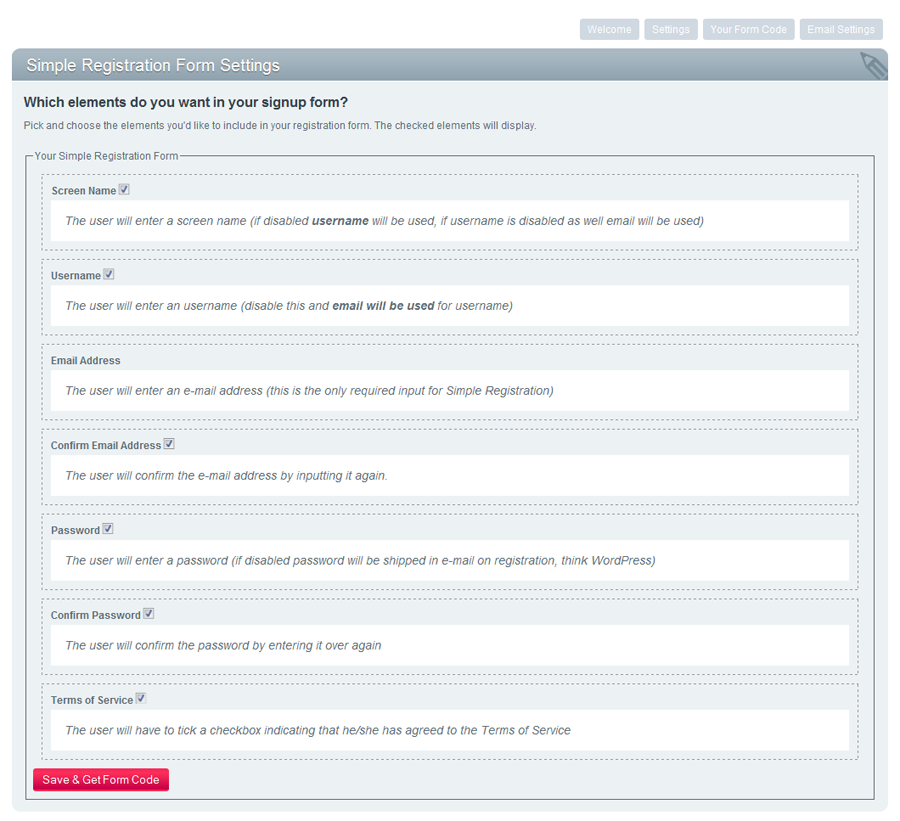
Simple Registration is a Stand-Alone Registration Form for EE - it enables you to put a registration form anywhere in your templates, so you don't have to edit the member templates. Also, you can decide which elements that should be required input when the user signs up.
Clicking "Simple Registration" in the module list takes you to the settings page instantly. Here you simply unselect the elements you do not want in your registration form and hit the "Save & Get Form Code" button.
Which will take you to:
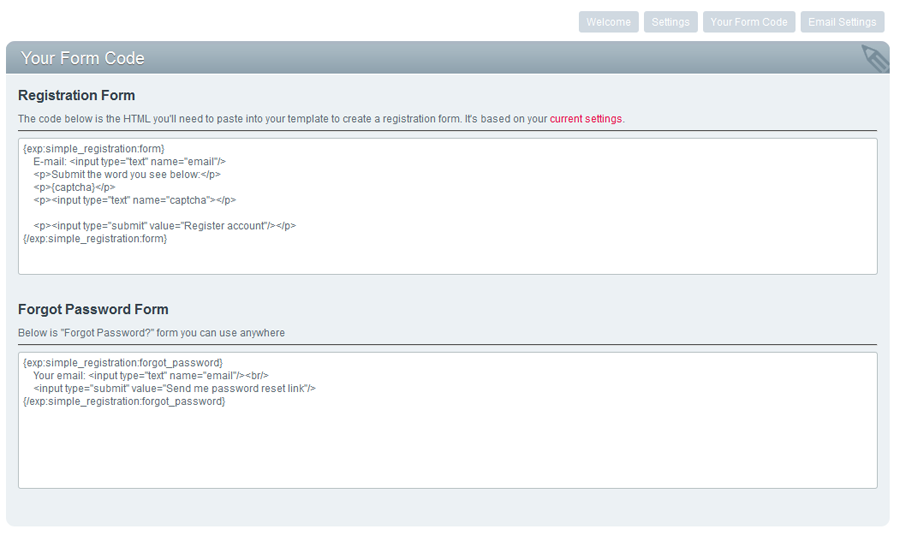
You can copy and paste this form code and use it in any template
Both {exp:simple_registration:form} and {exp:simple_registration:forgot_password} include parameters for id, name and class to override the default values
Example of a form that will instantly redirect the user to member_section/welcome after a successful signup (if you have no activation enabled for instance the user will also be logged in at that point and can start using his account):
{exp:simple_registration:form skip_success_message='y' return='member_section/welcome'}

    E-mail: <input type="text" name="email"/>

{/exp:simple_registration:form}
You can send out an email on member registration if you want. This email may include the user's password. Here's the full list of variables available in the email template:
User specific:
Site specific:
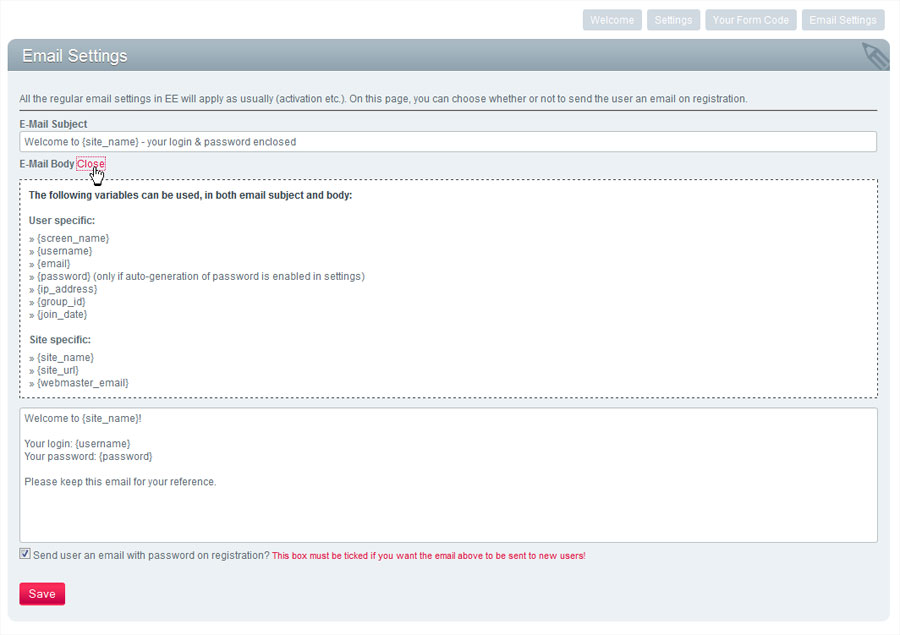
Keep in mind that this email will be sent out in addition to any email sent out by default by ExpressionEngine (ie. the activation email). If you do not want the activation email to be sent out you must disable activation in the member settings (Members -> Preferences).
Simple Registration will use ExpressionEngine's built in CAPTCHA settings. If member registration CAPTCHA is enabled the generated form code will include code to output the captcha:
{exp:simple_registration:form}

E-mail: <input type="text" name="email"/>

<p>Submit the word you see below:</p>

<p>{captcha}</p> <p><input type="text" name="captcha"></p>

<p><input type="submit" value="Register account"/></p>

{/exp:simple_registration:form}
If you would like to disable captcha navigate to "Members -> Preferences" and disable the "Enable Membership CAPTCHA" setting.
Most third-party EE addons which override the default EE captcha behaviour will simply replace the {captcha} in the generated code above so Simple Registration should not interfere with those.
First of all, please note that for custom fields you need to check the "Is field visible in registration page?" to be able to use the field with Simple Registration. This is a security measure by EE so that people cannot save data to custom fields which you have not explicitly specified should be visible for them upon registration. Also note, you need to add the field to the form yourself (ie. modify the html).
Normally EE will use the field database column name in the form code, so – for instance – if you were to add a custom field called referral_source you’d have code that looked something like this:
Where did you hear about us? <input name="m_field_id_23" type="text" />
With Simple Registration you can just use the name you gave the field in admin in your form code as well:
Where did you hear about us? <input name="referral_source" type="text" />
It makes more sense that way – it’s easier to remember and implement.
Note; if you want you can still use the standard EE code for the registration form. So you could e.g. copy the code for the custom fields that is generated in /member/register/ and paste it into your simple registration code.
You can also make use of ExpressionEngine's core profile fields when signing up. These fields can be found in the CP when registering a new user but are not normally available from the frontend (navigate to Members -> Register New Member).
You need to allow these fields explicitly in the form tag using the allow_fields. The example below shows a form using all the fields found in the ExpressionEngine CP. Note that allowing the field "bday" will allow all the three birthday feilds (bday_y, bday_m and bday_d).
{exp:simple_registration:form allow_fields="occupation|location|bday|interests|url|icq|aol_im|msn_im|yahoo_im|bio"}


....


<tr class="even">

<td><label for="url">URL</label></td>

<td><input type="text" name="url" value="http://" id="url" class="field" maxlength="150"></td>

</tr>

<tr class="odd">

<td><label for="location">Location</label></td>

<td><input type="text" name="location" value="" id="location" class="field" maxlength="50"></td>

</tr>


...


{/exp:simple_registration:form}
See full code here: http://pastebin.com/raw.php?i=vv0T5qv2
These days visitors are used to being shown what's wrong with the submitted form and getting help in correcting it. Use the parameter ajax="y" and you'll get error/success responses in JSON format. Simple Registration will even return an array with the fields that were errorneous and some info about them - enabling you to display the message next to the field where the problem is.
Success Response
{
    "status" : "success",
    "title" : "Registration Complete"
    "content" : "Your registration has been successfully completed.\n\nYou have just been sent an email containing membership activation instructions.",
    "content_no_tags" : "Your registration has been successfully completed.\n\nYou have just been sent an email containing membership activation instructions.",
    "heading" : "Thank You!",
    "redirect" : "",
    "link" : [ false,
      "AddonBakery"
    ],
        "member_id": "15",
}
Pretty standard stuff - check for the status == 'success' and then do your thing from there. Note that the member_id of the newly registered member is also returned, in case you need that for something.
Failure Response
If you get status == 'error' you'll have to do some more work. Here's an example of a registration submitted with 4(!) errors:
{
"status" : "error",
"title" : "Error"
"heading" : "The form you submitted contained the following errors",
"content" : "&lt;ul&gt;&lt;li&gt;The username you chose is not available&lt;/li&gt;\n&lt;li&gt;The password you submitted must be at least 5 characters long&lt;/li&gt;\n&lt;li&gt;You did not submit a valid email address&lt;/li&gt;\n&lt;li&gt;The following field is required:&nbsp;First Name&lt;/li&gt;\n&lt;/ul&gt;",
"content_no_tags" : "The username you chose is not available\nThe password you submitted must be at least 5 characters long\nYou did not submit a valid email address\nThe following field is required:&nbsp;First Name\n",
"error_fields" : {
"email" : { "error_key" : "invalid_email_address",
"message" : "You did not submit a valid email address"
},
"password" : { "error_key" : "none",
"message" : "The password you submitted must be at least 5 characters long"
},
"username" : { "error_key" : "username_taken",
"message" : "The username you chose is not available"
},
"br_fname" : { "error_key" : "mbr_field_required",
"message" : "The following field is required:&nbsp;First Name"
}
},
"redirect" : "",
"link" : [ "JavaScript:history.go(-1)",
"Return to Previous Page"
],
}
Notice that title, heading and content all contain the standard EE responses. content_no_tags is the same as content only it's plain text (unlike content which contain html).
Then there's the error_fields array which will give you information about which fields failed and why they failed. Take a look at the response for username for instance:
"username" : { "error_key" : "username_taken", "message" : "The username you chose is not available" }
From the key "username" you know that it's the username that's the problem, so you can highlight that field in your form. For the error message, use the "message" value - and then if you want to do more advanced stuff (based on what's actually wrong) you can use the "error_key" for that.
Custom fields errors will use the short name of the custom field as key. From the example above where the user forgot to input his first name, we can see:
"br_fname" : { "error_key" : "mbr_field_required", "message" : "The following field is required: First Name" }
The field's short name is "br_fname" (which is also what you could use in your form code btw.)
Note that you must submit the registration form to get these responses.
Most spambots attacking EE’s member registration will be used to EE’s built in registration form – and thus POST to /member/register. So, just by placing your registration form elsewhere you’ve already done a great deal to minimize spam signups. However, as we all know spammers are sneaky – so for this release we added some sneaky anti-spam functionality to our addon; namely a honeypot field.
{exp:simple_registration:form honeypot="username"}

    E-mail: <input name="email" type="text" />


    Please do not fill out this field as it is a honeypot field: <input name="username" type="test" />

    // note you can hide the honeypot field using javascript or css e.g. add a style="display:none";


<input type="submit" value="Register account" />

{/exp:simple_registration:form}
What will happen here is that the field with the name “username” will be used as a honeypot trap – meaning that if any data is entered in it, the registration will fail. Of course you should hide it with CSS so that normal users do not see it (or otherwise indicate to the users that they should leave it empty).
You can name your honeypot field anything – in this example we’re using “username” .. now, what spambot in their right mind wouldn’t fill out a field named “username”?
Signup Keys is a pretty versatile feature. Simply put you can generate as many signup keys you’d like and link each to a member group. This enables you to assign specific member groups to users on signup. Signup keys are used by adding an element named "signup_key" to your form.
Some use-cases could be:
Some examples:
You want to automatically assign all registered users to a "Beta user group":
Add a signup key for the "Beta user group" and add this code to your signup form:
<input type="hidden" name="signup_key" value="GENERATED_SIGNUP_KEY_GOES_HERE"/>
You want the user to be able to select his group when registering:
Add a signup key for each user group you want the user to be able to select between. Then use these values in a select dropdown in your form, like so:
<select name="signup_key">

   <option value="GENERATED_SIGNUP_KEY_1">User group #1</option>

   <option value="GENERATED_SIGNUP_KEY_2">User group #2</option>

</select>
You want to use the signup key as a "Beta Invite":
Add a signup key for the "Members" group and add an input field in your signup form:
Invite code: <input type="text" name="signup_key"/>
Then in EE's Members -> Preferences set "Default Member Group Assigned to New Members" to "Pending" for instance and generate one or more keys that you hand out to people you would like to invite.
A note about the "Trigger" event:
This option decides when the member group assignment should happen. As a general rule; if you have activation enabled you should use the trigger "Activation". This means that members will be assinged to the selected member group once they activate their membership. If you do not use activation, it should be set to "Signup". Note that Simple Registration will default to the value you should use when you add a new key.
The following hooks are available for developers who wish to hook onto Simple Registration.
simple_registration_success($member_id, $data, $ref)
This hook is called after a member is successfully registered using Simple Registration
$member_id - the database id of the new member
$data - an array with the members data
$ref - reference to the Simple Registration object
simple_registration_signyp_key_triggered($member_id, $signup_key, $trigger, $ref)
This hook is called when a signup key is triggered.
$member_id - the database id of the member triggering the signup key
$signup_key - the actual signup key used/triggered
$trigger - string specifying when the signup key was triggered (either 'activation' or 'signup')
$ref - reference to the simple registration object
simple_registration_honeypot_hit($registration_info, $ref)
Hook is called when a honeypot registration is encountered. It can be used to notify an anti-spam service such as Project Cerberus or similar.
$registration_info is an array containing the keys: ip_address, email, username, screen_name, url, honeypot, honeypot_key.
$ref is a reference to the Simple Registration object
simple_registration_email_password($email_info, $ref)
This hook is called just before sending an email to the user with the password (if this functionality is enabled)
$email_info is an array containing the keys: email_subject, email_body and email (the email being sent to). This array must be returned from the hook.. Addons can hook onto this hook to modify the content of the email.
$ref is a reference to the Simple Registration object.